Tag Archives: transfer

{CUTE} Burlap Memory Jar!

WE’VE MOVED!WE'RE MOVING!

Check out this post and other crafty inspiration over at our new blog!

www.mypapercraze.com


Good Morning and Happy {SHORT} week to everyone who enjoyed the holiday yesterday!  Today, let’s take a walk down memory lane together…

Burlap Memory Jar

When you get to be my age (we’ll just say I’m 29… again, lol), long ago memories seem to slip through the cracks.  Oh sure, I remember taking the kids to Disney World, the first ballet recital, the first home run.  But think about all the everyday moments we take for granted…  the twinkle in their eyes and the excitement in their voice telling you about their first day of school…  how they had lettuce, meat, and some kind of shell for lunch and realizing they’ve never seen a taco before (!)…  talking to them about being old and they pat you on the arm and innocently look up at you and say, “You’re not old, you just look old”…  And you think to yourself how you’ll never forget this moment.  {SIGH}

Then as time goes by, one by one, those cherished memories fade away.  I tell my daughter this all the time, to write down these moments, but I don’t think she really believes me, lol.  When I saw memory jars popping up on different blogs and Pinterest, I knew this was the answer for me!  Not only to open it up and read them once a year, but to document all those memories that I know will be lost.  Thankfully, I have four grandchildren so I get a second chance to preserve these memories that with all the hustle and bustle of raising my children, I didn’t think to do.

photo-1

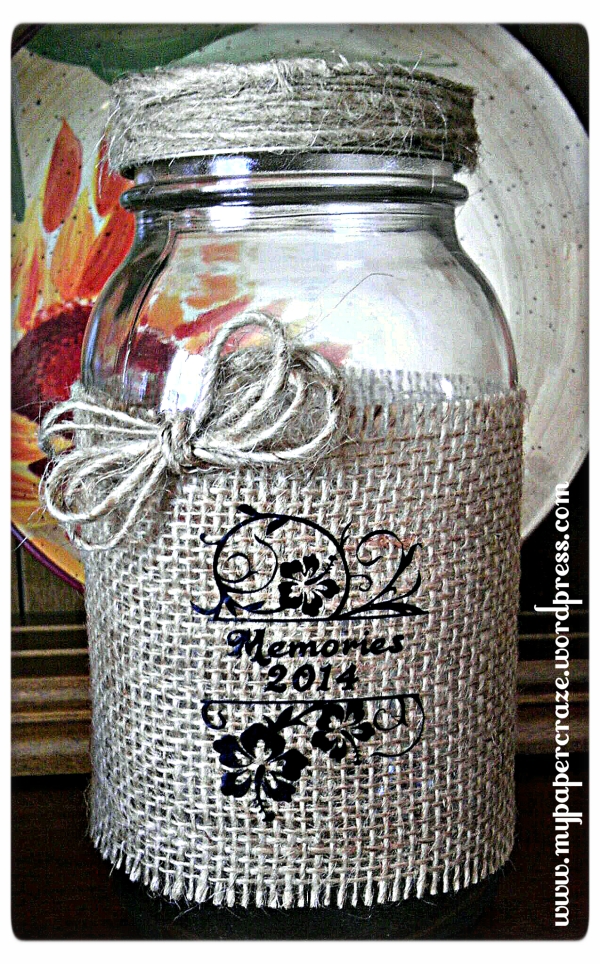
I kept my jar simple, decorating it just enough to sit on the kitchen island, which keeps it easily accessible.  I have my pen and small slips of paper handy!  After I’ve documented all those little moments, I’ll simple roll my papers up and place them in my jar to be relived over and over and over.  Can’t you just see me smiling with fond memories?

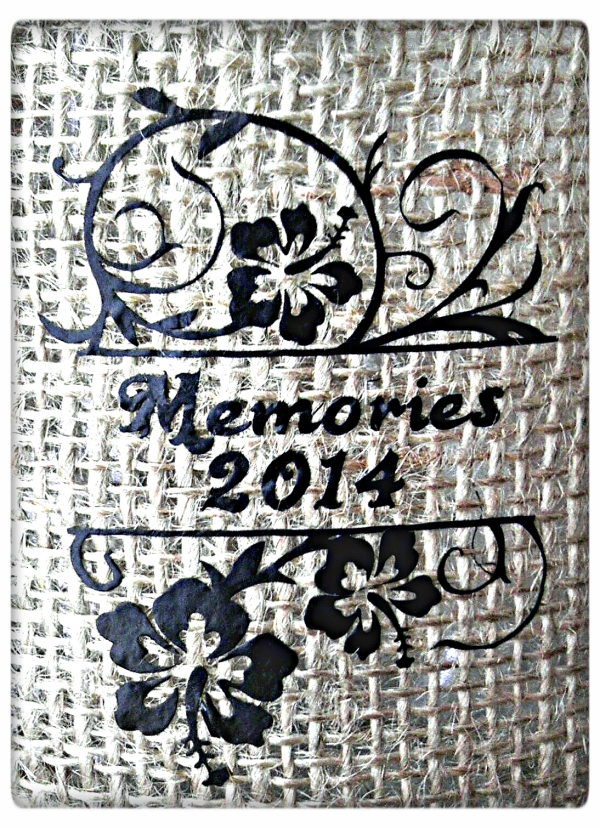
For my jar, I used black iron-on vinyl to cut my design on my Silhouette and ironed it onto a scrap piece of burlap.  I was actually surprised that this intricate cut adhered so well.  I hot glued the burlap around the center of my mason jar, wrapped jute twine around the ring and added a little bow just for fun.

photo-2

I hope all you Mothers and Grandmothers are finding a way to help preserve your precious memories.  A memory jar might not work for you, but be sure and find what does.  I promise, you’ll be so thankful you did… when you don’t just “look old”, you are old (LOL)!

Can you think of other uses for a Memory Jar?  How about Scrapbook journaling!  Be sure to share your project inspiration with us, we’d love to have your feedback!

Thanks for joining us again for this simple, but cute project today!  Be sure to check back later in the week for some inspiration for the upcoming Valentine’s Day!

Santa Claus is coming to town…

WE’VE MOVED!WE'RE MOVING!

Check out this post and other crafty inspiration over at our new blog!

www.mypapercraze.com


Good Morning and Ho Ho Ho!  Welcome to a wonderful DIY Christmas post that is super easy and super cute!  I can’t take credit for this adorable bag, it’s a fabulous Pinterest find!  I just fell in love with it and had to try it out for myself.  So here we go…

Photo 1 (2)2

Just imagine all the little goodies you can fill this little bag with and hand out for Christmas (or keep for yourself, I won’t tell!).  Interested in making your own?  Great idea!  Here’s the information on how to:

First, head over to SVGcuts.com and get the North Pole Express SVG Kit.

Second, pick up some cute little muslin bags from Amazon.  Remember my spiel on Amazon Prime?  Well, I won’t go into it again, but I’ll just say that Amazon has these Cotton Muslin Bags 4×6 Inch Red Hem Orange Drawstring 50 Count Pack for only $13.00, eligible for Amazon Prime with free 2-day shipping!

Third, while you are already getting these bags from Amazon, add Avery Personal Creations InkJet Iron-On Dark T-Shirt Transfers, White, Five Sheets per Pack.

Finally, you need red and white felt, white pom poms and red bakers twine.  You can raid your stash or pick up some up at a craft store, whatever works for you.  The amount of felt you need will depend on how many bags you plan on making.  If you’re making all 50, I would probably buy 10 sheets or so, to allow for mistakes.

So once your supply list is complete, print up the Santa Clauses on the iron on transfer sheets.  Be sure to measure the workable area on your muslin bags and size Santa accordingly AND read the directions for the transfer sheets.  The most important thing to remember is that you do not mirror the image for these types of transfer sheets, you just print straight on like you would regular paper.  You can set this up as a print and cut file in the Silhouette software, but that’s not really necessary, in my opinion.  These guys are easy enough to just cut out with good old fashioned scissors.

Once the images are printed and cut, have fun peeling the backing off the transfer sheets, lol.  This is the only difficult part about the whole process.  I don’t really have any quick tips on getting this done, just keep at it.  After peeling, lay the image on the muslin bag, cover with the cover sheet (included in the transfer packaging) and iron away.  Again, read the directions to make sure you iron for the correct amount of time.  I’d be a shame to ruin a cute little bag and waste the transfer paper!

Okay, so, now your images are on your bag.  The felt is a measure and cut by sight, unfortunately.  I started with a triangle and worked my way down from there.  Be sure to cut extra at the top of the red felt because it will tuck underneath the white.  Also, I doubled-up on the white felt since it’s slightly see-through.  The thicker felt looks cuter anyways.  Once you are satisfied with the felt cuts, grab your hot glue gun and glue away!  You’ll want to glue down the top part of the hat, the red felt looping over the white to come down to the bottom of the bag.  Then you’ll tack the tip down, grab a pom pom and bam, done.

To add an extra touch, I swapped out the draw string with red and white bakers twine.  This isn’t mandatory for normal muslin bags, but the Amazon bags up there have an orange draw string, so I would definitely recommend swapping that out.  But I’m a little crazy on the matchy-matchy colors, so it’s up to you.

So what do you think of this cute little craft?  It would even make a cute table accessory for Christmas dinner or Christmas Eve, stuffed with some cute little candies.  Can you think of other creative uses for these bags, or muslin bags in general?  I just love love love them and all their million possibilities.

Thanks for joining us again today, we sure appreciate your weekly dedication!  Stay tuned for more fun holiday posts to come!

With all my Amazon plugs, I recently joined up with the Amazon promotional incentive program.  While all projects, opinions and purchases are mine, I may potentially receive compensation for Amazon referrals.

Shared with:

Take it on Tuesday #100  http://romanceonadime.com/take-it-on-tuesday/take-tuesday-tiot-blog-hop-100/

Made by you Monday http://www.skiptomylou.org/2013/11/25/made-by-you-monday-179/

Make the Scene Monday #100  http://www.alderberryhill.com/make-the-scene-monday-100/

Handmade Tuesdays  http://ladybug-blessings.com/?p=4124

Tell Me Tuesday #47  http://www.lilmrstori.com/2013/11/tell-me-tuesday-47/

Awesome Things Tuesday  http://www.sowderingabout.com/2013/11/awesome-things-tuesday_26.html

Tutorials & Tips Linky Party #136  http://www.homestoriesatoz.com/tutorials/tutorials-tips-link-party-136.html

Wonderful Wednesday Blog Hop #49  http://tossedsaladlife.com/2013/11/wonderful-wednesday-blog-hop-49/

Silhouette Challenges #7  http://www.silhouettechallenges.com/2013/11/challenge-7-anything-holiday-week-4.html

The Party Bunch Link Party #7  http://whipperberry.com/2013/12/the-party-bunch-link-party-no-7.html

The PINcentive Blog Hop Week #14  http://www.croppedstories.blogspot.com/2013/12/the-pincentive-blog-hop-week-14.html#.UqaenPRDuSo