Monthly Archives: November 2013

Santa Claus is coming to town…

WE’VE MOVED!WE'RE MOVING!

Check out this post and other crafty inspiration over at our new blog!

www.mypapercraze.com


Good Morning and Ho Ho Ho!  Welcome to a wonderful DIY Christmas post that is super easy and super cute!  I can’t take credit for this adorable bag, it’s a fabulous Pinterest find!  I just fell in love with it and had to try it out for myself.  So here we go…

Photo 1 (2)2

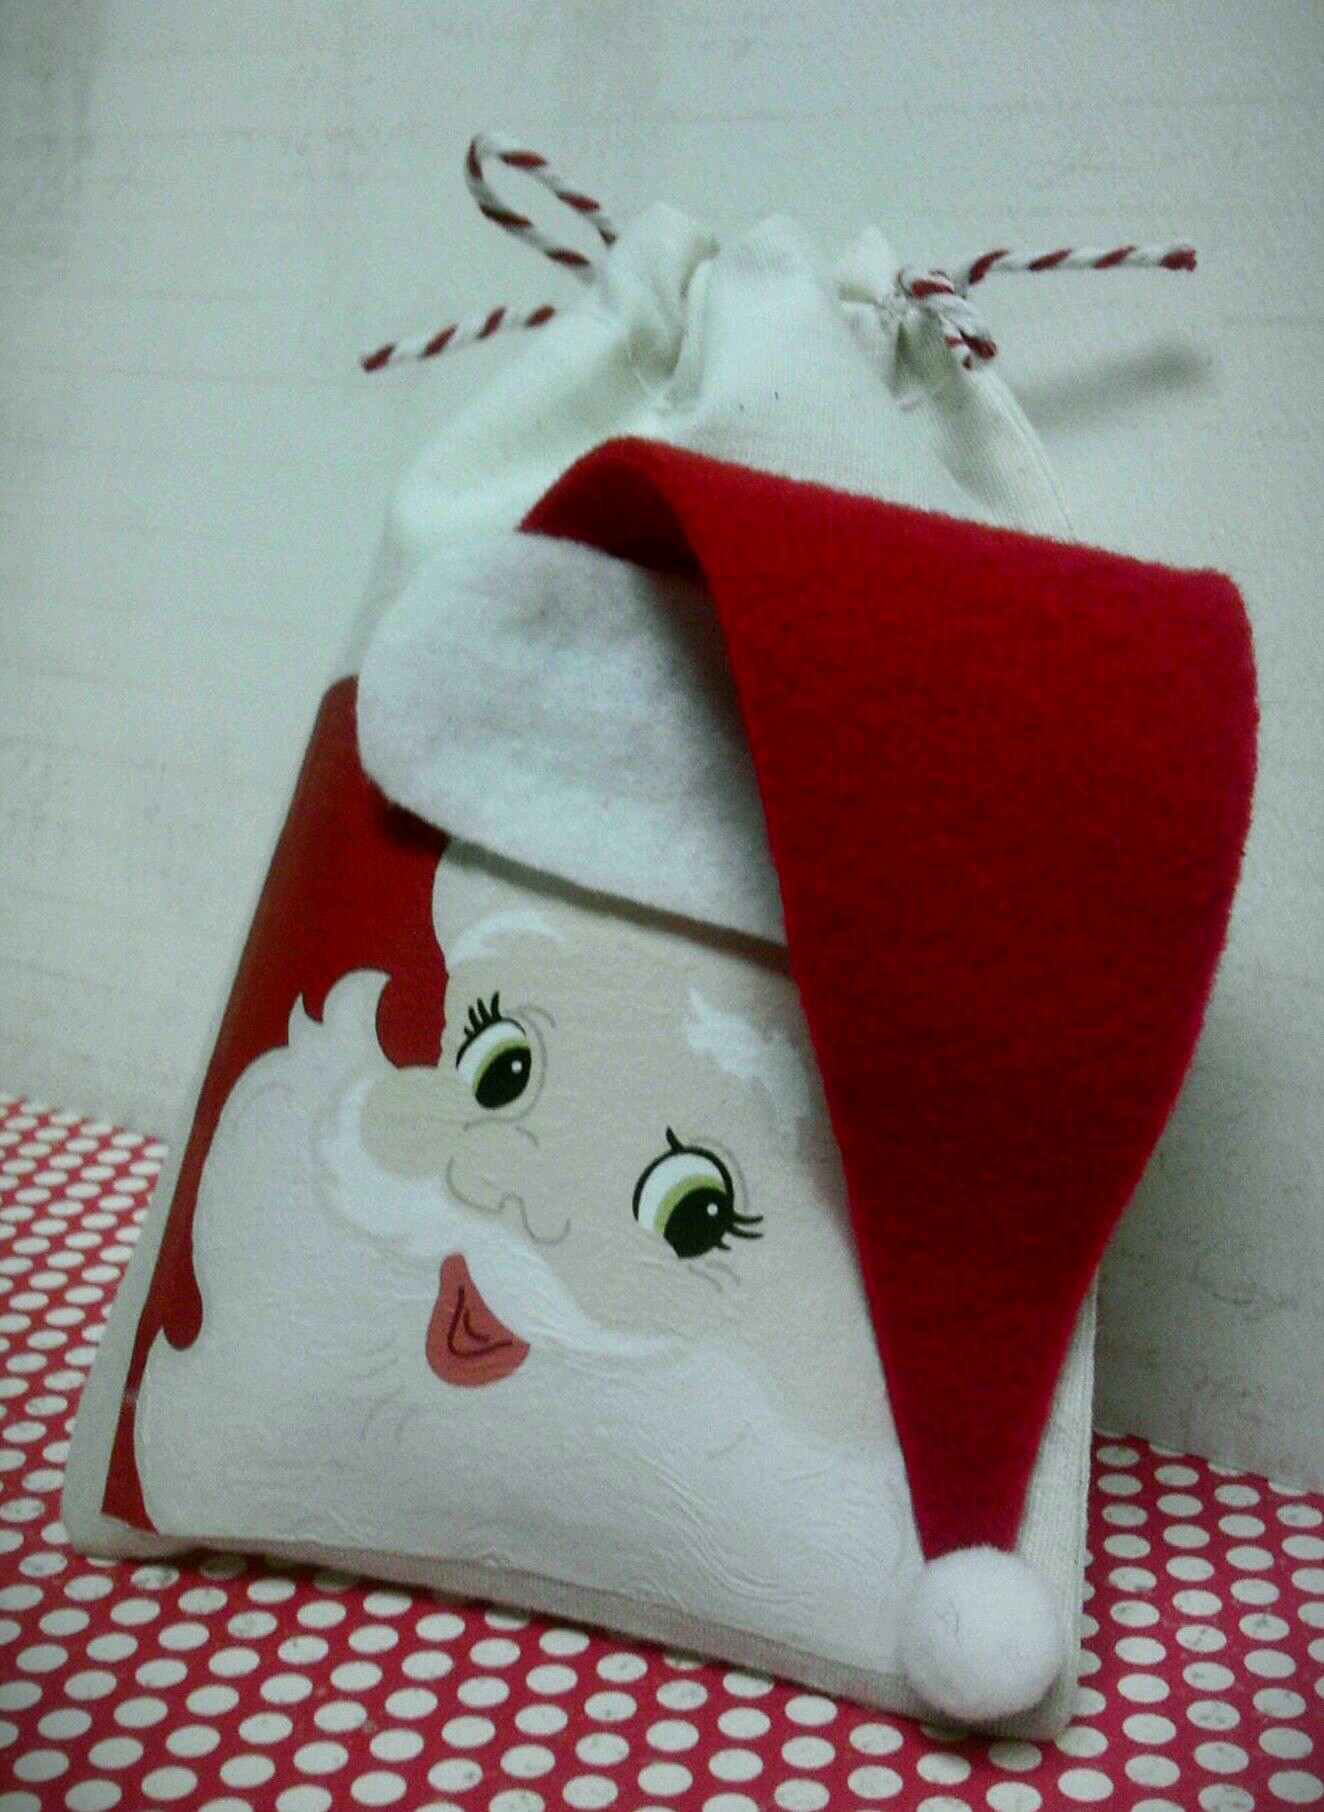
Just imagine all the little goodies you can fill this little bag with and hand out for Christmas (or keep for yourself, I won’t tell!).  Interested in making your own?  Great idea!  Here’s the information on how to:

First, head over to SVGcuts.com and get the North Pole Express SVG Kit.

Second, pick up some cute little muslin bags from Amazon.  Remember my spiel on Amazon Prime?  Well, I won’t go into it again, but I’ll just say that Amazon has these Cotton Muslin Bags 4×6 Inch Red Hem Orange Drawstring 50 Count Pack for only $13.00, eligible for Amazon Prime with free 2-day shipping!

Third, while you are already getting these bags from Amazon, add Avery Personal Creations InkJet Iron-On Dark T-Shirt Transfers, White, Five Sheets per Pack.

Finally, you need red and white felt, white pom poms and red bakers twine.  You can raid your stash or pick up some up at a craft store, whatever works for you.  The amount of felt you need will depend on how many bags you plan on making.  If you’re making all 50, I would probably buy 10 sheets or so, to allow for mistakes.

So once your supply list is complete, print up the Santa Clauses on the iron on transfer sheets.  Be sure to measure the workable area on your muslin bags and size Santa accordingly AND read the directions for the transfer sheets.  The most important thing to remember is that you do not mirror the image for these types of transfer sheets, you just print straight on like you would regular paper.  You can set this up as a print and cut file in the Silhouette software, but that’s not really necessary, in my opinion.  These guys are easy enough to just cut out with good old fashioned scissors.

Once the images are printed and cut, have fun peeling the backing off the transfer sheets, lol.  This is the only difficult part about the whole process.  I don’t really have any quick tips on getting this done, just keep at it.  After peeling, lay the image on the muslin bag, cover with the cover sheet (included in the transfer packaging) and iron away.  Again, read the directions to make sure you iron for the correct amount of time.  I’d be a shame to ruin a cute little bag and waste the transfer paper!

Okay, so, now your images are on your bag.  The felt is a measure and cut by sight, unfortunately.  I started with a triangle and worked my way down from there.  Be sure to cut extra at the top of the red felt because it will tuck underneath the white.  Also, I doubled-up on the white felt since it’s slightly see-through.  The thicker felt looks cuter anyways.  Once you are satisfied with the felt cuts, grab your hot glue gun and glue away!  You’ll want to glue down the top part of the hat, the red felt looping over the white to come down to the bottom of the bag.  Then you’ll tack the tip down, grab a pom pom and bam, done.

To add an extra touch, I swapped out the draw string with red and white bakers twine.  This isn’t mandatory for normal muslin bags, but the Amazon bags up there have an orange draw string, so I would definitely recommend swapping that out.  But I’m a little crazy on the matchy-matchy colors, so it’s up to you.

So what do you think of this cute little craft?  It would even make a cute table accessory for Christmas dinner or Christmas Eve, stuffed with some cute little candies.  Can you think of other creative uses for these bags, or muslin bags in general?  I just love love love them and all their million possibilities.

Thanks for joining us again today, we sure appreciate your weekly dedication!  Stay tuned for more fun holiday posts to come!

With all my Amazon plugs, I recently joined up with the Amazon promotional incentive program.  While all projects, opinions and purchases are mine, I may potentially receive compensation for Amazon referrals.

Shared with:

Take it on Tuesday #100  http://romanceonadime.com/take-it-on-tuesday/take-tuesday-tiot-blog-hop-100/

Made by you Monday http://www.skiptomylou.org/2013/11/25/made-by-you-monday-179/

Make the Scene Monday #100  http://www.alderberryhill.com/make-the-scene-monday-100/

Handmade Tuesdays  http://ladybug-blessings.com/?p=4124

Tell Me Tuesday #47  http://www.lilmrstori.com/2013/11/tell-me-tuesday-47/

Awesome Things Tuesday  http://www.sowderingabout.com/2013/11/awesome-things-tuesday_26.html

Tutorials & Tips Linky Party #136  http://www.homestoriesatoz.com/tutorials/tutorials-tips-link-party-136.html

Wonderful Wednesday Blog Hop #49  http://tossedsaladlife.com/2013/11/wonderful-wednesday-blog-hop-49/

Silhouette Challenges #7  http://www.silhouettechallenges.com/2013/11/challenge-7-anything-holiday-week-4.html

The Party Bunch Link Party #7  http://whipperberry.com/2013/12/the-party-bunch-link-party-no-7.html

The PINcentive Blog Hop Week #14  http://www.croppedstories.blogspot.com/2013/12/the-pincentive-blog-hop-week-14.html#.UqaenPRDuSo

Must Have Tools for Scrapbookers

WE’VE MOVED!WE'RE MOVING!

Check out this post and other crafty inspiration over at our new blog!

www.mypapercraze.com


Good… Evening? Wow, ever have one of those days where time just gets away from you? No, not you, lol. Well, I have those days all the time. I officially started a week long vacation (yay!) and now all my days are lost in the crafting abyss! But tonight’s post will be a good read for any soon-to-be crafters or newbies. It’s a list of must have tools for Scrapbooking! Don’t let the name fool you, many of these tools come in handy for other crafts, too. Also, I thought this would be a good time to start on that Christmas list to mail off to Santa… LOL.

If you do not have Amazon Prime, stop what you are doing and go sign up for your FREE trial membership.  I promise it is one of the best investments you will make!  Especially with all this crafting, I don’t have time to always run back and forth to the store to pick up all the tools and supplies that I need.  With Amazon Prime, I get FREE 2-Day shipping on all eligible items!  It’s a sweet deal in my opinion.  Here, I’ll make it easy for you.  You’re welcome.

All signed up for your trial?  Good!  That’ll make it even easier… I’ve linked all my recommendations to Amazon so you can just bounce on over—just click on the photo!  AND all of these items are Amazon Prime eligible.  I know, how generous of me!  You’re welcome (again).

First and foremost, go by a good pair of scissors. Quite frankly, I don’t care if you go to the dollar store, but buy one pair of scissors dedicate strictly to papercrafting. Have kids or a husband, then also buy a chain and lock to keep them safe or you might find them confinscated for opening a freezie pop. Yep, sticky mess all over them, just have to donate them to the cause and buy another pair. If you are not going to the dollar store, I recommend Fiskars Scissors 8″ Bent Performance Zebra.  Are they the best scissors out there?  Maybe, maybe not.  But they get the job done and they are pretty.  Enough said.

Second, every crafter needs a paper trimmer.  “What, I just bought a new pair of scissors, why do I need a paper trimmer, too?”  Because… this nifty tool cuts in a straight line better than you can.  PLUS, you will find five million things that it is good for above and beyond paper.  Fabric?  Check.  Ribbon?  Check.  I suggest a rotary cutter.  They are slightly more expensive to begin with, but I have found that the blades last longer (still on my first one!), they come with optional blades (like perforated edge or wavy line), and they don’t tear delicate paper because the blade slices through like a pizza cutter instead of forcing a blade to slide through.  I use Fiskars 154470-1001 Folding LED SureCut Rotary Paper Trimmer, 12-Inch.

I spent the first half of my crafting life with tears and seared fingertips thanks to my wonderful hot glue gun.  Did you know they made low temperature glue guns that make them more bearable?  Well, I didn’t, lol.  I finally picked one up and haven’t put it down since.  Again, I’m not convinced at this point that brand matters.  I know others will tell you differently, but I love the fact that if mine goes out tomorrow, I won’t be crushed at the huge investment I just lost.  I use Ad-Tech – Temp Mini Glue Gun and it works just fine for me AND it comes in pink.

This next tool is for scrapbookers.  If you are not a scrapbooker, please skip ahead, lol.  BUT, if you are a scrapbooker (or cardmaker) this little tool is just what you need… a tape glider!  I’ll jump to the chase.  This little adhesive dispensing gun is a piece of cake to use once you give it a shot and the refillable tape is great on a budget compared to smaller adhesive dispensers.  But my favorite part is that if you put it in the right place, just slap your paper or cardstock on top and wham, it’s done.  No waiting for glue to dry or any of that nonsense.  BUT say you rolled some tape on there and realized you wanted it on the other side (I know you’ve done it a time or two!), you just rub the adhesive right off with your fingers.  Can you say OMG?  Removable adhesive?  Absolutely.  So roll your little heart out.  This beauty is the Scotch CAT 085 Advanced Tape Glider with 2 Rolls of 1/4-Inch by 36-Yard Acid Free Tape, Cure Pink.

Need something to glue down smaller detail items?  I’ve got that covered, too.  I’ll warn you, though, this one is not removable.  You can usually erase it off with a standard pink school eraser, though.  But you’ll be surprised how many times you find yourself reaching for this little guy, it’s amazing!  EK Tools Zig Memory System 2-Way Squeeze and Roll Glue Pen.

Now this next little tool is another cutting utensil.  It may be small but it packs a big punch!  In the world of crafting, there is always a need for trimming and piecing and slicing and this does the trick!  I absolutely could not go one day without my craft knife.  I haven’t tried any others, but my Fiskars 12-67007097 Softgrip Craft Knife has worked fine.

Got your shopping list all made out?  It’s just not complete without throwing in one more item… a cutting machine!  Now, I know this one is not a “must-have”, but I want to put it out there before anyone makes the mistake I did and buys a Cricut.  Also, let me say this… I loved my Cricut while I had it.  I’m sure that many people out there are loyal Cricut users and there is nothing wrong with that.  BUT, before you buy a cutting machine, look up comparisons of the Cricut and the Silhouette.  In my humble opinion, Silhouette leaves the Cricut in the dust.  I won’t go into details, but I will say that the Silhouette is available in two sizes, depending on your need and your budget, so don’t mark it off your list as “too expensive” until you consider what you would spend in embellishments at the craft store that you could cut with your own machine!

Silhouette Portrait

Silhouette Cameo

We have both in our little crafting family and they haven’t let us down yet!

So now that your list is complete, go ahead and seal it in an envelope and mail it to the North Pole so the elves have plenty of time to put in an order at Silhouette America, LOL.  Did I mention FREE 2-day shipping on all of these items?  I know Amazon Prime has a ton of features, but that is really my favorite one.  Hop on over to Amazon and check out for more information.

Well I hope everyone found at least one new tool to add to their crafting shopping list!  With the holidays upon us, what better time to break out the old crafting supplies and get started on some handmade Christmas crafts or presents!  Be sure to stay tuned for more great projects to come!

Turkey Day Ideas

WE’VE MOVED!WE'RE MOVING!

Check out this post and other crafty inspiration over at our new blog!

www.mypapercraze.com


Good Morning, good morning!  Are you getting excited about the upcoming holidays?  I sure am.  I’ll let you in on a little secret… it’s all about the food for me, LOL.  But decorating is my second favorite thing about holidays, I just can’t ever find enough time to do enough of it!  Especially Thanksgiving, it seems to just sneak right up on me every year.  Don’t pretend like you don’t know what I mean, I know there are plenty of you out there who are in the same predicament!  So, being the kind and generous person I am, here are my top favorite Thanksgiving ideas that we can all squeeze in before the big Turkey Day arrives!

Before you start any serious décor planning, you need to think about your table settings.  This is my first year hosting Thanksgiving and this was the most intimidating part for me.  What goes where?  What all do I need?  Do I have enough silverware?  Will I have any room left on the table for decorations?  Well, Peggy Pardo at Decorating Files sure tackled this for us by posting Tabletop Tuesday: Easy Guide to a Proper Table Setting.  She offers varying place setting diagrams, describes what each item in the setting is AND even added some table setting tips for us uninformed hostesses!  Thanks, Peggy!

ProperTableSettingFormal

Before you get too crazy planning all these ideas for your table settings and décor, you absolutely must check out The Tomkat Studio with Kim Stoegbauer!  Her post for the Free Printable Thanksgiving Collection was sent to me this past week and I absolutely fell in love with the sheer beauty of her design.  And the best part?  She is offering FREE PRINTABLES so that you too can have such beautiful Thanksgiving decorations in your own home!  Thanks, Kim!

give thanks

Are you overwhelmed yet?  No?  Well check out these awesome ideas compiled at tatertots & jello!  Jen’s post on Great Ideas – 21 Thanksgiving DIY Ideas is just fabulous for finding inspiration on Thanksgiving crafts!  The only hard part about this is choosing which ideas you want to use!  Banners, kids crafts… you name it, she has it.  Thanks, Jen for being so fabulous!

21-diy-thanksgiving-ideas4

Still up for more?  Hop on over to A Diamond in the Stuff and check out Courtney’s post on her {Give Thanks} Mantel!  It was love at first sight for me and how awesome of her to give us the how-to on making out own?  That’s double-awesome in my book.  Thanks, Courtney!

mantel

Ready to have some real fun?  Let’s head on over to the kid’s table with Linnette at Paper Glitter!  She is so super generous in offering her FREE Thanksgiving / Fall Kit and it is absolutely to die for!  I know someone who will have a reserved spot this year — ME!  Be sure you get these must-haves for the kiddos in your family!

kids

Last but certainly not least, let’s not forget the reason we are all gathering around the feast as Thanksgiving is celebrating all the things that we are thankful for.  Here is a fun activity that is sure to bring everyone together and be a cute décor item, too!  A Give Thanks Tree!  Whether you do it as a group or individually, read them out loud or reflect quietly, a Give Thanks Tree should be a must-have in every home!  Check out Aly at It Happened Like This and her absolutely fabulous Give Thanks Tree!  I am in awe at the simplistic beauty!  Will you be enjoying your Thanksgiving at a relative or friend’s house?  Be sure to think ahead and show your gratitude with a hostess gift, Aly has some great ideas for you in her Hostess Gift Ideas post!  Thanks, Aly!

tree

And finally, to wrap it all up, Dos and Don’t to Survive Thanksgiving and Other Family Gatherings is a must read for all Mom’s on Thanksgiving.  I know I sure enjoyed it and I’m sure you will too!  All laughs brought to you by Mom Spark!

Now that you’ve been exposed to all these fabulous Thanksgiving ideas, what are you going to do first?  Plan you table, make a banner, put together your own Give Thanks tree?  Whatever you do, I’m sure it’ll be fabulous!  I know I have more than a few to-do items on my list to get my Thanksgiving in gear this weekend!  Hopefully I’ll be posting some after pictures if all turns out right.  If not, well, better luck next year!  Stay tuned!

DIY Peppermint Body Scrub

WE’VE MOVED!WE'RE MOVING!

Check out this post and other crafty inspiration over at our new blog!

www.mypapercraze.com


Good Afternoon and welcome to another fun crafting journey! Thanks for your patience with the later-than-usual post today. I’ll give you a short intro and maybe it’ll help to also describe why today’s post is so vital to your sanity (and mine!). Hubby wanted to go hunting today (!) so it was up to me to get everyone ready and off to school. For most people this is a daily routine, but most days I’m just luck to have matching shoes. Now, let me start by saying that I’ve been terribly sick for the past week, which means that I started to get behind on my crafting (eek!). So, it’s been nothing but long days and longer nights trying to get everything done for some upcoming deadlines. So, after late night # 5,681,327… guess who oversleeps this morning (of all mornings!). ME. So I rush out of bed and call my emergency bail-me-out-of-this-situation resource… MOM. Let’s just say that in less than 40 minutes we were all ready and out the door, me on my way to work and Mom taking the kids to school and babysitting the little angel. Geez, what a close call. So off to work, trying not to get a speeding ticket, work work work all day long, come home and do it all over again. Moral of the story is… doesn’t every day seem like this in one way or another? I know some days are easier than others, but it just seems like a never-ending cycle! So, I just want to say how important it is to take ME time, even if that means hiding in the closet for five minutes to stuff your face with a candy bar so you don’t have to share. It’s okay, we all do it. I keep cookies in my car, but that’s our little secret, right?

So today we bring you a fun and simple DIY craft that you (and your girlfriends!) are sure to enjoy. It’s also a wonderful way to plunge right into your holiday crafts with no special tools required, yay! BUT the most important part of today’s project… you get to earn some ME time because you just HAVE to test this out! I mean, how can you give it to your friends if you haven’t tried it yourself? So… enjoy!

peppermintcandy1

As with all instructions, please read all the way to the end BEFORE you plunge into this project.

Ingredients:
1 cup of Epsom Salt
1/4 cup of Olive Oil
10-15 drops of Peppermint Essential Oil
Red food coloring

Makes twelve (12) 4-ounce jars

1. Combine Epsom Salt, Peppermint Essential Oil and Olive Oil into a bowl and mix well.
2. Separate the mixture into two halves, two separate bowls.
3. Add 2-3 drops of red food coloring to one half and mix until colored evenly.
4. Spoon a small amount of white mixture into the jar and smooth into an even layer.
5. Repeat with the red/pink mixture. Continue layering the colors until the jar is full.
6. Screw on lid and tada – DIY Peppermint Body Scrub!

You can’t leave a cute little jar like this naked! We used some red and white bakers twine and tied a cute little tag on there (including an ingredient list). We also layered a red and white stripped pattern paper from our Christmas stash to a little extra pazzazz. Who wouldn’t love to get one of these in their stocking?

100MEDIA_IMAG0101-1-1

100MEDIA_IMAG0102-1-1

Epsom salt and olive oil can be purchased at your local grocery store.  Most of you already have bakers twine or some other sort of ribbon in your crafting stash.  But where do you get the cute little jars and Peppermint Essential Oil?  Let me show you my secret weapon.  Here are the jars and oil I purchased from Amazon (approx.. $24 total).  But wait, that’s not the best part… with Amazon Prime these items are eligible for FREE 2DAY SHIPPING!  Now, I do not work for Amazon or receive any compensation from them in any way, but I must say that Amazon Prime is one of the best investments of my life.  Everyone is eligible for a free trial, though, so check it out today, you won’t be sorry!  Okay, enough of that.  But seriously, try it out.  So I bought these off of Amazon and they worked perfectly!

jar

Ball Jar Crystal Jelly Jars with Lids and Bands, Quilted, Set of 12 – 4 ounce

oil

Organic Peppermint Essential Oil. 30 ml (1 oz.) 100% Pure, Undiluted, Therapeutic Grade

Now, I haven’t tried any other combinations as of yet, but I bet this scrub would work perfectly with just about any type of scented oil.  I’m totally adding this on my to-do list for the future… I’ll have a whole collection of jars before I’m done, LOL.  Speaking of jars, anyone have any of those cute glass baby food jars?  I know I do!  Maybe I don’t need to purchase more jars after all…

Thanks again for joining us today!  We sure hope you enjoy this super easy recipe and don’t forget to share with all your girlfriends!  Be sure to comment below if you have any other fun and easy ME time recipes to pass along to the group!

Sharing with:

Tell Me Tuesday #46 http://www.lilmrstori.com/2013/11/tell-me-tuesday-46/

Just Because November Linky Party http://justbcreativecrazy.blogspot.com/2013/11/novembers-linky-party.html

Sunday Funday #15 http://everydayisanoccasion.com/sunday-funday-15/

Inspire Me Fridays Linky Party http://asimplefive.blogspot.com/p/inspire-me-fridays.html

Give Me the Goods #35 http://www.maisondepax.com/2013/11/give-me-the-goods-no-35.html

Scrapbooking: Digital vs. Traditional

WE’VE MOVED!WE'RE MOVING!

Check out this post and other crafty inspiration over at our new blog!

www.mypapercraze.com


Good Morning and Happy Sunday! I hope everyone had a wonderful and crafty weekend! So many holidays coming up, it’s hard to find time to craft for them all and keep up with your daily crafts! Oh, is that just me that overloads my schedule? No, I didn’t think so. So I was posed with the question recently… what’s easier, digital or traditional scrapbooking? And I thought… what a wonderful way to (belatedly) kick of Scrapbooking Sundays!  So that will be today’s post topic for all that are interested. I have attempted to offer a few comparisons on the major differences between digital scrapbooking.

I’m sure everyone knows by now what scrapbooking is. Just in case, scrapbooking is building a collection of memories and dressing the up for all to see (or just you, whatever). I choose my most important memories and sometimes a few random photos and build a page that will help me and my children remember all the fun and excitement of their childhood. One day, if I can ever make myself part with all my hard work, I might even bestow it upon them to show and share with their children. As of now, it’s not looking good, but I try to remember that they will grow up one day…

Scrapbooks pages can be bound in a scrapbook album or stored digitally on your computer, depending on which you choose. The pages vary in size: commonly 8×8 and 12×12. You can have two page layouts or just one page snapshots. They can technically go in any order, but I prefer chronological. The biggest draw back is how expensive scrapbooking can be… or seem. So let’s jump into our comparison.

Now, I do feel it is only fair for me to disclose that I am a paper crafter, not a digital scrapbooker, but I will try to be unbiased in my review.  Please be gentle when judging my review of digital scrapbooking.

The first major comparison is price. Which one costs more? When I strolled down the scrapbooking isle at my local craft store for the first time, I could have passed out seeing all the prices on all the cool embellishments I needed… and that didn’t even include the paper packs and the actual scrapbook album. OMG, I was so overwhelmed that I just had to leave. At this time, I didn’t even know they had digital scrapbooking, so my journey came to an end. Then I started on other paper crafts… handmade cards… goodie bag tags… and I slowly started to accumulate all the fantastic tools available… for a price. Next thing I knew I had hundreds of dollars in tools. Good news is that now I could make my own embellishments for scrapbooks. Bad news is… it still ended up costing a lot of money. However, the truth is that scrapbooking is how expensive or INexpensive as you make it. We all want the nice shiny decorations in our scrapbooks (or paper crafts) but you can technically grab a piece of paper and go to town. The important part is that you are preserving a memory that is important to you. There are tons of layout ideas online for you to follow. If you are especially crafty, grab some markers and glitter and create to your heart’s content.

So let’s look at the price of digital scrapbooking. It’s on the computer and you don’t have to have all those tools, so it must be a lot cheaper, right? Not necessarily. From the websites I have looked at, you still get what you pay for. For example, I looked at Shutterfly, pages starting under $10. From what I saw, these pages are basic photo pages with a background, no embellishments. Then I looked at a website that advertised free digital scrapbooks, and discovered that most digital scrapbooking requires some type of photo editing software to assemble your pages, the most popular selling for $99 retail. It is also my understanding that once these pages are compiled, you then have to print them (cost of ink and paper) or send them to a professional printer. If you want 12×12 pages, you would have to have a wide-format printer or pay the price of a professional… plus still pay for the scrapbook album, page covers, etc.

Next, let’s look at a time comparison. The truth behind the time that it takes to scrapbook is all about you (and research). If you grab a sheet of paper and throw a photo on there, you may get a little lost at what direction to go.  The same would go for (most) digital scrapbooking.  The key behind both is to go online and look for ideas on how you want your layout to look.  Then, grab a sheet of paper and jot down some notes or even draw a diagram.  I have personally found that this helps tremendously, bringing an idea to the table instead of bumbling around with a few photos and a dream.  I will also let you in on a little secret… I subscribe to A LOT of blogs.  I like to go through them and save the ones that inspire projects in me, including scrapbooking.

You can also go to Google Images (my secret weapon) and search for “Birthday Scrapbook Layout” and it will show you tons of layouts that others have done, hopefully giving you some inspiration for your own.  Here is one I found that I just love… courtesy of Sketches in Thyme.  When you find an image or layout that you like, you can click on it and visit the page that it originated from.  Chances are, if you like that layout, they will have tons of others that you will like, too!  Most scrapbooks (or crafters) have a style that carries throughout their other projects.

pls-logofinal

So let’s wrap this up with a quick summary… which is easier, least time consuming and cost less money?  Neither.  Scrapbooking is what you make it.  Truth be told you can buy all the tools and software you want, but when it comes down to putting photo to paper, it’s up to you to turn a photo into a work of art.  Obviously, I choose traditional scrapbooking, but that’s not a show of favoritism, it’s just a personal preference.  If you truly don’t have the time or creativity to create scrapbook layouts, you can purchase pre-made layouts on many marketplace sites, such as Etsy.  You’ll pay for them, but technically, it probably wouldn’t be any more than what you would pay in time and money to create your own.  I also prefer to support local crafters in my network, and it saves on shipping costs when you buy local – a win win.  If you are a crafting snob (that’s right, you know who you are!) then you probably shouldn’t buy pre-made pages since it won’t be how you would have done it, LOL.

So, I’m not sure if that actually helps anyone, but hopefully it’ll be of some benefit if anyone has been debating scrapbooking lately.  I hope to being some of the less expensive techniques to your computer with the coming weeks so that you can see it really is anyone’s craft.  If you’re already a scrapbooker, be sure to jot down your best technique and money saving tips to share with the group!  We love you have your comments and feedback!  In the meantime, we’ll have some projects coming up soon that you are sure to enjoy!

DIY Fine Art Gallery

WE’VE MOVED!WE'RE MOVING!

Check out this post and other crafty inspiration over at our new blog!

www.mypapercraze.com


Good Afternoon and thanks for joining us for another project! I’m very excited about today’s project — it’s all about ART. I don’t know how many fine art enthusiasts we have in our audience, but I assure you this project won’t disappoint. Here is an art display that is sure to suite anyone’s taste…

20131115_140235

Talk about a fine art collection! Isn’t it adorable? I absolutely love, love, love this idea! I’ve struggled for a very long time with keeping our artwork pinned on the refrigerator. It seemed I was always losing magnets, papers floating to the floor, hope that’s just water that it landed in!… all just to get out the gallon of milk. I even started putting artwork on the side of the refrigerator, but that was over the trash can so guess where our precious artwork ended up then? The land of no return.

So after reviewing different layouts from different websites and photo galleries, I decided I liked the photo frame idea. This worked great because we have a ton of “generic” frames laying around begging to be repurposed. I also just happened to have some corkboard laying around that did not serve it’s intended purpose, so I cut the tiles to size and was able to reuse them as well. As a matter of fact, the only expense I had for this project was a few adhesive strips, I had the brown vinyl already, too! It’s a win-win anytime I get to repurpose old supplies and create beautiful projects at the same time! As always, here are a few in progress photos and short tutorial.

First, I secured the corkboards to the wall using adhesive strips.

20131115_134140

20131115_131040

Second, I centered the corkboard and glued the frames to the wall. Yep, just hot glued them straight on there. The best idea? Probably not, but hey, it’s too late now anyways. It’ll give me a reason to repaint the walls when I redecorate.

20131115_134149     20131115_134157

Third, I cut the vinyl on my fabulous Silhouette Cameo cutting machine and transferred it directly to the wall. For any true artists out there, you could paint the gallery verbiage onto your wall if you so choose. Any not artisans, there are many resources available for to purchase custom vinyl.

 20131115_140001

The hardest part of the project is lining up the frames, corkboard and vinyl on your wall. Honestly, I lined mine up by sight, not a method I recommend at all. There are a variety of methods from a measuring tape to laser lines, so just use what works best for you.

20131115_140015

Thanks again for joining us today. Hope you enjoyed our project! Keep tuned for more fun, we’re getting into the holidays and will be ringing in the season with lots of fun projects (and goodies!) to come!  Don’t forget to subscribe to our blog via email to have our posts delivered straight to your inbox!  Have a great weekend!

Shared with:

Awesome Things Tuesday  http://www.sowderingabout.com/2013/11/awesome-things-tuesday.html

The Weekly Creative #39  http://www.thegirlcreative.com/2014/01/02/weekly-creative-39.html

Veteran’s Day Fun!

WE’VE MOVED!WE'RE MOVING!

Check out this post and other crafty inspiration over at our new blog!

www.mypapercraze.com


Good morning and thanks for joining us on another fun journey this week! Today I bring to you a fun craft we did on Veteran’s Day for the family to enjoy — fabric paint t-shirts! I can’t take credit for the design (thank you Google!) BUT I can say the handprints are original 😉 Here’s what we were able to put together and the best part is that this was KID FRIENDLY! Yippee!

20131108_201709_resized     20131108_201719_resized

Super cute and a fabulous way to show our support and appreciation of all our Veterans!  I know this design won’t be good again until Forth of July, but imagine all the possibilities for the upcoming holidays… Christmas trees, candy canes, gingerbread men, oh my!

20131108_202000_resized

So here’s the down-low on making these beauties.  Supplies?  I used plain white t-shirts.  Brand isn’t important to me, but use your preference.  Fabric paint?  Here’s the brand I used (purchased from Amazon.com), but this is my first time, so I don’t know how it compares to other brands.  These paints were sold in a nifty “starter” pack of various colors, so it was perfect for what I needed.

Technically that is all the supplies you need.  I did use sponges to help apply the red lines in the flag, but that is up to you.  Fingers work just as well.  Here are some in-process photos.


20131108_195944_resized     20131108_195948_resized

20131108_201218_resized      20131108_201334_resized

20131108_200831_resized

A few lessons learned from this craft…

1.  The paint will bleed through to the back of the shirt.  I would recommend putting a barrier in between.

2.  This also means it will bleed through to the floor.  It wipes off the tile, but watch out for other surfaces or carpet!

20131108_200837_resized3.  We had to repeat the handprints to get a good color, otherwise they looked too light.  This is not the easiest task for kids, so I recommend lining up their little hands for them.

20131111_111335_resized_1


So now, with no further introduction, here is our group celebrating Veteran’s Day! Thanks again for joining us today for another crafty post, we hope you continue to enjoy our projects and find inspiration for your own!  As always, feel free to share any input or project ideas with the group and stay tuned for more projects to come!


Shared with Tell Me Tuesday #45 http://www.lilmrstori.com/2013/11/tell-me-tuesday-45/

Jingle all the Way!

WE’VE MOVED!WE'RE MOVING!

Check out this post and other crafty inspiration over at our new blog!

www.mypapercraze.com


Good Morning and welcome to a Special Edition post on this fabulous Veteran’s Day!  And speaking of fabulous holidays, who’s ready for a little Christmas crafting?  Me, me!  Today we bring you a wonderful project that we “borrowed” with permission from the Kerri Bradford Studio.  She has some wonderful projects, be sure to check out everything she has to offer!  So check out this project and then we’ll move on to the how-to of making this beauty…

 20131103_230520_resized_2

I know, it’s amazing, right?  This is absolutely one of my favorite projects yet!  Let’s enjoy a few more photos…

20131103_230538_resized_1  20131103_230621_resized_1  20131103_230559_resized_1

Okay, so before I get too carried away, here is the supplies you need:

  • Shadow box, any size will work
  • Jingle bells, silver and red
  • Christmas-themed scrapbook paper for the backdrop
  • Black vinyl
  • The cut file from the Kerri Bradford Studio

As you can see, you simply remove the back to your shadow box to add your jingle bells.  Add the scrapbook paper on top, cut to the size of your box, if needed.  Replace the back and flip it over.  Then cut out the vinyl sentiment and apply it to the front of your box, straight on the glass.  And voila!  What a beautiful addition to your Christmas décor… or a fabulous gift?  Absolutely.

Can you think of other ways to apply this neat concept?  I’m thinking a “Let It Snow” theme… coming soon!  We hope you enjoyed this simple yet beautiful Christmas project!  Stay tuned for more projects to come that are sure to put some jingle in your step for the coming holiday season!

TheSilhouetteChallenge-TTC&Friends

We submitted this project as part of our November Silhouette Challenge Group Post.  Be sure to check out my other blog-buddies to see their amazing projects, too!

DIY Ironing Board Hanger by The Turquoise Home
Silhouette Challenge: Time Zone Bathroom Art by Nearly Handmade
Santa’s Christmas Countdown by Tried & True
Nautical Anchor Pillow Tutorial by The Thinking Closet
Christmas Card Ornament with Free Cut File by unOriginalMom
Thanksgiving and Christmas Dual Sign by Architecture of a Mom
Itching to Etch by Get Silvered
Snowman Tag ~ Silhouette Challenge by Whats Next Ma
Thanksgiving Sign by Chicken Scratch NY
DIY Horse Silhouette Pillow by Rain on a Tin Roof
Sketching on Fabric by The Sensory Emporium
Paper Leaf Garland by Lil’ Mrs. Tori
DIY Blessing Board – Silhouette Challenge by One Tough Mother
Christmas Pillow by Create & Babble
Glass Painting with Reverse Stencils by Givemeapaintbrush
Chalkboard Thankful Tree by Cutesy Crafts
Bottoms Up! MYO Wine Tag by From Wine to Whine
‘Happy Holly-days’ Tags for the Swap by An Elegant Touch…
Thank You for Dinner (Card) by Everyday Paper
Advent Star Christmas Countdown by My Favorite Finds
Geometric Fabric Bowls by Please Excuse My Craftermath…
Paper Carnival by Home At Eight
Silhouette Cameo Tutorial: Dual Sided Business Cards by Black and White Obsession
In Case of Emergency Baby Bag Tags by Tossed Salad Life
Christmas On My Mind by Creative Turn
Christmas Lights Garland by Making Home Base
We Are Thankful by 4 You With Love
Seattle Skyline Silhouette by Sowdering About in Seattle
DIY Stenciled Mugs by Coley’s Corner

Interested in joining us for our group posting event next month? We’d love to have you.  Simply fill out the new member request form, and Lauren from The Thinking Closet will get you squared away.

Shared with Give Me the Goods Linky Party #34  http://rainonatinroof.com/2013/11/give-goods-link-party-34/

Can we all sit at the Kid’s Table?

WE’VE MOVED!WE'RE MOVING!

Check out this post and other crafty inspiration over at our new blog!

www.mypapercraze.com


Good Morning and welcome to another fabulous For the Love of Friday!  I don’t know about you, but dang I’m glad it’s Friday.  Not only because it’s the day before the weekend, but because I finally get to showcase another project in the Project Spotlight at Pretty Paper, Pretty Ribbons!  YAY!  If you haven’t checked out Lisa’s Blog and PPPR store, put it on your to-do list today!  She has the most adorable files and digital papers, not to mention all the great project inspiration she passes on!

So today we’re going to show you that being banished to the Kid’s Table is not as bad as it used to be… as a matter of fact, I’m totally sitting at the Kid’s Table with all of these neat decorations and games!  Check this out (be sure to click on it for a close-up!):

6732629

So what we have here is a fabulous treat bag for Thanksgiving goodies, a scarecrow placemat to decorate the setting, a place setting name tag!, a cute little silverware wrapper AND a 3D turkey napkin holder!  And that’s just the decorations!  THEN, we have an adorable little puzzle and coloring book!  Forget the prim-and-proper (aka BORING) table, I’m sitting with the kids this year!

For all these little projects, we combined several sets from Pretty Paper, Pretty Ribbons to create these projects: Nuts About You, First Thanksgiving, Thanksgiving Wear, Fall Festival and the Oval Window Treat Bag.  For the patterned papers, we used the Pumpkin Spice Collection, also from Pretty Paper, Pretty Ribbons!  So much fun!

So what great ideas do you have for your Kid’s Table (or your BORING table, LOL)?  Did these ideas help you plan out your project list for Thanksgiving?  Do you have any other great ideas to share?  Please leave a comment and let us know!  A big thanks to Pretty Paper, Pretty Ribbons for the spotlight.  We hope you enjoyed today as much as we did!  Have a wonderful weekend and stay tuned for more fun holiday posts to come!

I Heart Fall!

WE’VE MOVED!WE'RE MOVING!

Check out this post and other crafty inspiration over at our new blog!

www.mypapercraze.com


Good Morning and Happy Fall!  Did I ever mention that Fall is my favorite season?  To celebrate bringing in the time of Thanksgiving, we have a fall fabric wreath for you that would be the perfect accessory to your harvest décor.  Check out these photos.

20131026_170511_resized_1

20131026_170502_resized_1

20131026_170312_resized_1

Super cute, right?  The best part is that you can choose any fabric you want!  Interested in making your own?  Here are the supplies I used and a few in process photos.  For a full tutorial, search YouTube for numerous crafters sharing their skills.  The basic one-two-threes of it is to tie strips of various fabric and ribbons around a styrafoam wreath form.

For my wreath, I chose an orange and white chevron pattern, solid brown and a beautiful orange and yellow leaf pattern.

20131026_151900_resized_1

For my ribbon, I chose yellow and white chevron, white with orange polka dots, and a woven solid brown.

20131026_151912_resized_1

Most of you know I’m a papercrafter at heart, so my handy-dandy straight edge cutter sure came in handy for cutting my strips of fabric.  I simply left it folded and went to work.  These strips were too long for the wreath, so I cut them in thirds to get the desired length.

20131026_151855_resized

Basic styrafoam wreath form.

20131026_151931_resized_1

Start tying away.  I alternated my patterns and ribbons.

20131026_160258_resized_1

20131026_162207_resized_1

20131026_163417_resized_1

Once I got this far, I flipped it over for the first time.  The back actually looks really awesome, too.

20131026_163410_resized_1

20131026_163404_resized_1

And ta-da, here we go, back to the finished product!

20131026_170312_resized_1

Can you think of other ways to use this type of wreath making?  How about a Thanksgiving centerpiece?  A messy banner?  Choices, choices.  We hope you enjoyed today’s post.  Be sure to check back on Friday for another special post and more Thanksgiving fun!  OR, just subscribe via email and have the posts delivered to you!  Until Friday…

Sharing with Creative Connection #19  http://www.waittilyourfathergetshome.com/2013/11/07/creative-connection-19/