Tag Archives: Vinyl

DIY Glass Block Monthly Craft Night… A New Tradition!

WE’VE MOVED!WE'RE MOVING!

Check out this post and other crafty inspiration over at our new blog!

www.mypapercraze.com


<meta name=”p:domain_verify” content=”558d291c9af0df8fd947f8cb3dbe084c”/>

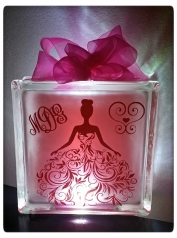
Hi friends!  Glad to see you here again!  I’m excited to share with you that we hosted our first tutorial group class this past weekend!  You know how much we love these glass blocks… I mean, who doesn’t?  They’re fabulous!  Mixing them with vinyl is a perfect melding of my two loves.  So we introduce to you our DIY Glass Block Group Craft.

Header2We had such a blast, meeting and networking with fellow crafters.  My favorite part, other than the crafting, was that each attendee specialized in a unique craft.  We got to pow-wow about all types of crafting and share our areas of specialties.  Who knows, maybe we’ll take turns hosting and sharing our skills with the group!  Allow me to introduce our beautiful little crafting network…

collage

We had so much fun, we’ve decided to host a Monthly Craft Night with a different project each month!  Interested in hosting a craft night yourself?  Here are a few helpful tips that might come in handy!

  • Consider your potential attendees when choosing a date, time and location.  I kept my “meeting time” fluid until everyone had a chance to weigh in on what worked for their schedule.
  • Scout out free locations unless you want to host the craft night at your house OR pay a rental fee.  JoAnn’s offers free use of their craft rooms, as long as they don’t have an organized craft class of their own.  Just call and ask and they’ll sign you up!  Also helps to be in a craft store if you have any forgotten supplies!
  • Facebook is a great organizer, especially if you are already connected to a local crafters network.  I organized a Facebook event, invited my potential attendees and started to pow-wow on crafting ideas.
  • Connect with Pinterest!  I started a group board for all of us to pin our ideas on.  It was a great way to express our interests with pictures!  You can post the link on your Facebook event so that everyone has access!
  • When choosing a craft, think about the supplies (that you will have to lug around!).  Are you going to supply everything?  Do you have enough for everyone?  Are there any supplies you will need to order or have shipped?
  • Consider your total costs and communicate it with your group.  You don’t want to buy supplies and have members of your group be surprised when it’s time to pay up.
  • Plan far enough in advance to get all the supplies you need, especially if you have to order anything online.  When I decided on glass blocks, I stalked the Hobby Lobby newspaper to get the best price.  I only got a few funny looks when I walked out with 20 blocks in my shopping cart, but it was worth it!
  • Prepare as much as you can in advance.  For me, I conversed with each attendee weeks in advance to order the vinyl, set up the design in the Silhouette software and frost the glass blocks, if necessary.
  • HAVE FUN!  Remember, crafting is FUN FUN FUN, so don’t organize to the point where it sucks the fun out of it!  If it’s easier, have everyone bring their own supplies.  You can work on the details as you have an opportunity to host more and more events.

This was such a great time for everyone, including myself.  We sure hope to keep up the tradition!  If you happen to be in the Pensacola, Florida area, come and join us one Saturday!  We’d love to have you!

If you enjoyed this post, be sure to check out these others…

{ELEGANT} Decor Night Light by My Paper CrazeDIY Sweetheart Glass Block Tutorial {with FREE CUT FILE} by My Paper Craze{ELEGANT} Princess Night Light by My Paper Craze

Guest Post: {ELEGANT} Decor Night Light

WE’VE MOVED!WE'RE MOVING!

Check out this post and other crafty inspiration over at our new blog!

www.mypapercraze.com


Good Morning all my fabulous crafters! We are honored to be another guest blogger today for Brenna @ Life After Laundry with our {Elegant} Décor Night Light!  Here is just a sneak peek, so be sure to jump on over and check out the full tutorial and all the other great projects Brenna has to offer.

IMAG0348-13

Thanks again Brenna for hosting our guest post!  Don’t forget to check her out!

250xNxMe-Picture_png_pagespeed_ic_90kPGWeehv

Here are a few of my favorite projects from Life After Laundry… be sure to check them out!

 600x361xCute-and-Easy-Labels-LifeAfterLaundry_com__png_pagespeed_ic_2YaeUX7Wcs

600x408xMy-DIY-Travel-Makeup-Brush-Roll_thumb_png_pagespeed_ic_7E6tMIHdM8

{ELEGANT} Princess Night Light

WE’VE MOVED!WE'RE MOVING!

Check out this post and other crafty inspiration over at our new blog!

www.mypapercraze.com


Good Afternoon!  We have another wonderful guest post for you today over at Creative Ramblings!  I’ll give you a quick sneak peek, but then you have to hop on over and visit Sarah for the full tutorial!

glass block2

Thanks, Sarah, for having me as a guest blogger and a big thank you to all my fabulous readers for your continued support of my crafting addiction!

crafting + coffee = LOVE

WE’VE MOVED!WE'RE MOVING!

Check out this post and other crafty inspiration over at our new blog!

www.mypapercraze.com


love-67a

Good Afternoon and welcome back to our little journey into crafting.  Today is another short a sweet and includes two of my favorite things… crafting and coffee!

I am a huge fan of the dollar store and often just browse around to see if I can find any hidden goodies to craft with!  They are a big help when it comes to crafting new ideas since there is not a large investment with your medium.  A few days ago, I bought a few of the cheapie white coffee mugs, seeing a blank canvas and a whole lot of inspiration!

Introducing… Mr. and Mrs. Right!

IMAG0342

I just love these little guys… although my husband was a little less thrilled {LOL}.  I think these make an awesome wedding gift, what better way to start a marriage off on the right foot!

As you can tell, I slapped these mugs together with red and black Silhouette brand vinyl {AND} the mustache and lips are available in the Silhouette Online Store {YAY!}.  I do always recommend measuring your work area before you begin so you can design it straight in your Silhouette software.

Looking for some inspiration of your own?  Check out our Coffee Mugs Pinterest Board, there are a ton of great ideas floating around!

Stay tuned for more crafty fun right around the corner.  We have a lot of surprises coming soon!

Valentine’s Day Shadow Box

WE’VE MOVED!WE'RE MOVING!

Check out this post and other crafty inspiration over at our new blog!

www.mypapercraze.com


empty-picture-frame-pngblack-frame--empty--choo-choo-clan-art-gifts-hltwg5a0

Can you feel the love in the air?  They say holidays are what you make them, but I always feel that there is a little extra romance added in on Valentine’s Day that comes from the same place as cute puppies and slobbery baby kisses.  ~sigh~  🙂

For Valentine’s Day, let me let you in on a little secret … I love me some shadow boxes!  I look at them almost every holiday to decide which ones are the right ones.  They are so super easy to put together but still gives  that “wow” factor for your décor.  I mean, who can resist picking it up  for a little shake?  This time, it is rose petals…

valentines-day-shadow-box


Here’s the short and long of it…

Supplies:

  • Shadow box, any size
  • Patterned paper, cut to size
  • Silk rose petals (great dollar store find!)
  • Scissors or a paper trimmer (for trimming said patterned paper)
  • Coordinating vinyl, I used red and black from Silhouette America**
  • Silhouette cutting machine**
  • transfer tape (I used clear contact paper***)

**I created my sentiment with vinyl and my awesome Silhouette cutting machine {BUT} you could pick up any adhesive embellishment to adhere to the front of the glass at your local craft store.  I’ve seen shadow boxes decorated with glittered chipboard elements, flowers and even stickers. All it takes is a little imagination!

***I find it much easier to layer my vinyl using the clear contact paper, but have received mixed reviews on it’s effectiveness and potentially leaving behind a sticky residue.  I have not experienced any problems thus far, but be warned {LOL}.

I started by opening up my shadow box and filling it about 1/2 full with the rose petals.  I then placed my pattern paper on the back to use as a background and closed it up.  I chose a sentiment, immediately recognizing that layering the black and red would really set the design off.

shadow-box-vinyl

Once I had layered the black vinyl on top of the red, all that left to do was adhere it to the front of the glass!  I lined mine up by sight, but it’s not a bad idea to measure, either!

shadow-box-layered

See how easy that was?  Shadow boxes have so many possibilities!  It takes all my self control not to stock up on them every chance I get, but they are a favorite at my house!

valentine-shadow-box

I won’t take up any more of your romancing time today, but be sure to check back for more crafty goings-ons around here soon!  Happy Valentine’s Day!

DIY Sweetheart Glass Block Tutorial {with FREE CUT FILE}

WE’VE MOVED!WE'RE MOVING!

Check out this post and other crafty inspiration over at our new blog!

www.mypapercraze.com


Follow my blog with Bloglovin

Header

Good Morning and thank you for joining us for another {AMAZING} project today!  We have a special surprise for you today… We’re guest posting for Heather Boney at The Frill of Life!  Be sure to hop on over to her blog to see all the {AMAZING} projects she has going on!  As blog-buddies in the Silhouette Challenge Group, I know she brings a wealth of inspiration to all her readers!

The Frill of Life

Ready to get in the mood for a little romance?  If you’re anything like me, Valentine’s Day is one of those holiday’s that seems to sneak up out of nowhere.  So, let’s check out a super cute Valentine’s Day project to spark some inspiration!

Introducing my first glass block craft…

20140120_205242_resized

Isn’t it {BEAUTIFUL}!  I am absolutely thrilled with how it turned out.  Crafting and candy?  That’s a win-win for me, LOL.  I put together a brief tutorial on how I created this Valentine’s beauty {AND} included the link to download the vinyl cut file put together by yours truly!

Supplies2

First, here are the supplies you will need…

  • Glass block
  • Six bags of Sweetheart candy conversation hearts
  • Ribbon
  • Vinyl*
  • LOVE Cut File

*If an electronic cutting machine is unavailable to you, don’t despair!  Just grab some craft paint (and stencil, if needed) and create your own design!

Tutorial

  1. First, cut and apply your vinyl design to your glass block.  I find it’s easier to line up the design with the block still empty.  You can download the LOVE Cut File for Silhouette Studio, if desired.
  2. Turn the block upside-down, fill with approximately six bags of conversation hearts (I used Sweetheart brand).  For the last few candy pieces, insert the large bottom stopper and continue to fill through the smaller opening.  You may have to shuffle pieces around to accommodate the space needed by the stoppers.
  3. Once filled, stretch out a length of ribbon, placing the glass block on top.  You should be able to adjust your ribbon by sliding it back and forth beneath the block.  Pull tight and tie a bow.  If using a sheer ribbon as I did, you may want to layer the ribbon a few times around the block for greater contrast.

And {TA-DA}, project complete!  How did yours turn out?  I’m sure it’s {BEAUTIFUL}!  Not only are these cute décor items to display for Valentine’s Day, these make wonderful gifts!  And with the simplicity of this project, I can think of plenty of people that would {LOVE} to receive one of these beauties!

What other designs can you think of for glass blocks?  Filled with {KISSES}?  Chocolate {HEARTS}?  Flower petals?  I’m excited to hear what everyone comes up with!  I’m sure Heather would too, so don’t forget about stopping by The Frill of Life and showing her some bloggy-love!

I have a lot of happenings going on in the next week {cough, cough… give-a-way… cough, cough), so be sure to check back frequently!  OR better yet, subscribe via email OR BlogLovin’ to get all my latest and greatest posts delivered to you!

{CUTE} Burlap Memory Jar!

WE’VE MOVED!WE'RE MOVING!

Check out this post and other crafty inspiration over at our new blog!

www.mypapercraze.com


Good Morning and Happy {SHORT} week to everyone who enjoyed the holiday yesterday!  Today, let’s take a walk down memory lane together…

Burlap Memory Jar

When you get to be my age (we’ll just say I’m 29… again, lol), long ago memories seem to slip through the cracks.  Oh sure, I remember taking the kids to Disney World, the first ballet recital, the first home run.  But think about all the everyday moments we take for granted…  the twinkle in their eyes and the excitement in their voice telling you about their first day of school…  how they had lettuce, meat, and some kind of shell for lunch and realizing they’ve never seen a taco before (!)…  talking to them about being old and they pat you on the arm and innocently look up at you and say, “You’re not old, you just look old”…  And you think to yourself how you’ll never forget this moment.  {SIGH}

Then as time goes by, one by one, those cherished memories fade away.  I tell my daughter this all the time, to write down these moments, but I don’t think she really believes me, lol.  When I saw memory jars popping up on different blogs and Pinterest, I knew this was the answer for me!  Not only to open it up and read them once a year, but to document all those memories that I know will be lost.  Thankfully, I have four grandchildren so I get a second chance to preserve these memories that with all the hustle and bustle of raising my children, I didn’t think to do.

photo-1

I kept my jar simple, decorating it just enough to sit on the kitchen island, which keeps it easily accessible.  I have my pen and small slips of paper handy!  After I’ve documented all those little moments, I’ll simple roll my papers up and place them in my jar to be relived over and over and over.  Can’t you just see me smiling with fond memories?

For my jar, I used black iron-on vinyl to cut my design on my Silhouette and ironed it onto a scrap piece of burlap.  I was actually surprised that this intricate cut adhered so well.  I hot glued the burlap around the center of my mason jar, wrapped jute twine around the ring and added a little bow just for fun.

photo-2

I hope all you Mothers and Grandmothers are finding a way to help preserve your precious memories.  A memory jar might not work for you, but be sure and find what does.  I promise, you’ll be so thankful you did… when you don’t just “look old”, you are old (LOL)!

Can you think of other uses for a Memory Jar?  How about Scrapbook journaling!  Be sure to share your project inspiration with us, we’d love to have your feedback!

Thanks for joining us again for this simple, but cute project today!  Be sure to check back later in the week for some inspiration for the upcoming Valentine’s Day!

Mixing Organization and Function: An Easy Conversion Chart

WE’VE MOVED!WE'RE MOVING!

Check out this post and other crafty inspiration over at our new blog!

www.mypapercraze.com


It’s that time again!…  Time for our monthly Silhouette Challenge Group post (yippie!).  This month’s theme is {ORGANIZATION}.  Well, let me tell you, I could write a book on what NOT to do, lol.  I must be the most UNorganized person on earth.  This year, my New Year’s resolution is to get to doing some of the amazing organization projects I seem to be constantly pinning on my Pinterest board… and this challenge may just be the perfect inspiration to get me motivated!

TheSilhouetteChallenge-TTC&Friends

For any of my new followers, I am fortunate to be part of an online Silhouette support group that also hosts a monthly challenge.  Below you will find my {AMAZING} project, as well as projects from other {AMAZING} group buddies!  Be sure to stop by and show them some bloggy-love (links below)!  They continue to be a wealth of inspiration!

Back to my project… I chose to start in the kitchen.  The reality is that I don’t cook much, but when I do, I want my most commonly used tools to be handy.  There is nothing worse than having to dig through a cabinet or drawer trying to find the utensil I need.  Of course, for inspiration, I went straight to Pinterest (my favorite resource!).  I had pinned a version of this project some time ago but I didn’t want to attach anything permanent to the inside of my cabinets… so I changed it up a little!  Introducing… my version of a vinyl conversion chart with and easy storage solution!

Photo 1 (1)Photo 1 (6)Photo 1 (7)I’m telling you this picture just does not fully express the genius of this project!  With one swift move of opening the cabinet door, I have full access to each measuring spoon or cup, fully labeled, and a conversion chart to top it all off… literally!

I was a little nervous about attempting this project because I had never cut anything from vinyl.  My first step was measuring the space inside my cabinet door.  I then measured my measuring cups and spoons to determine how much space they would use.  Using the Silhouette Studio Designer software, I set up my cut file by welding rectangles and setting up my text spacing.  It helped to do it all at once so I could see exactly what the finished project would look like.  Once my design was completed, I printed it and taped it up on my cabinet door to make sure I had sized everything correctly.

Once I was satisfied with my design, I was ready to cut the vinyl.  I used black Silhouette adhesive vinyl and I was thrilled that it cut perfectly the first time.  The weeding did take a little bit of time but it was worth it.  I used clear contact paper to transfer the vinyl onto the cabinet door.

The last step was attaching the command hooks below the appropriate text.  I love how it turned out.  I think the hardest part of this project was to keep from falling off the ladder!

Photo 8Photo 5 (2)Photo 1 (5)

Can you believe how simple this was to do?  If you do much crafting, you know what it’s like to spend hours on a project… and it turns out to be a big flop!  Not this time, though!  I was so proud of myself and excited that it had turned out exactly as I had planned, so I ran outside (a feat all in itself!) and got my husband so I could show him my huge accomplishment.  As I explained to him what I had done, describing every little step in detail, I reached up and closed the cabinet door… and {BAM}… the door wouldn’t close.  UGH!  I had forgotten to take into account the spacing of the shelves inside.  The measuring cups weren’t spaced to fit between the shelves and therefore, effectively putting a crimp in my {AMAZING} project..  I’ve got to tell you, I just wanted to crawl into a hole at that moment.  I mean, couldn’t I have figured this out BEFORE trying to show off?  Evidently not.  But my husband, being forever supportive of my efforts, quickly pointed out that I could simply adjust the shelves in the cabinet.  You can’t imagine how relieved I was.  Although it did take the wind out of my sail for a moment, in the end, it all worked out.

Can you think of any other nifty ways to store items that would combine {ORGANIZATION} and {FUNCTION}?  I’m sure my blog-buddies will be able to offer us some more crafty inspiration to help organize in the new year!

Get organized with your Silhouette Machine!

  1. DIY Window Shutter Mail Organizer by Weekend Craft
  2. Kids’ Art Wall by Tried & True
  3. Organizing Silhouette and Craft Supplies by The Happier Homemaker
  4. Simple Recipe Organization by It’s Always Craft Time
  5. Put a Label on it! Herb Names for Plant Stakes by Get Silvered
  6. Super Simple Linen Closet Labels by Two Purple Couches
  7. Beware of the Animals Vinyl Toy Box by A Tossed Salad Life
  8. Child desk accessories by Architecture of a Mom
  9. Organizing & the Important of Labels by The Turquoise Home
  10. Index Card Organizer for Easier Meal Planning by Chicken Scratch NY
  11. Create Craft Room Labels by Dragonfly & Lilypads
  12. Simple Storage Solution for your Christmas Ornaments by Vintage News Junkie
  13. Organize this: DIY Planner Covers, Tags & Dividers (made with Cereal Boxes) by Black and White Obsession
  14. How to Make a Cut File into a Print & Cut by Create & Babble
  15. Simple Chest Freezer Organizational Board by Nearly Handmade
  16. Vinyl Your Kitchen Canisters! by From Wine to Whine
  17. Nursery Closet Dividers & Silhouette Cut File by Creative Ramblings
  18. Make Custom Box Templates with a Silhouette for Drawer Organization by One Dog Woof
  19. Organizing the Craft Room by What’s Next Ma
  20. Vinyl Wall Calendar by Crafts Cakes and Cats
  21. Personalized Toy Storage Bins by Lil’ Mrs. Tori
  22. Personalized Routine Chart by Work in Progress
  23. Blog Planner Sheet Dividers + Free Cut Files by TitiCrafty by Camila
  24. Simple Project Calendar by Little Blue’s Room
  25. Dry Erase Photo Frame Menu Board + Free Cut File by Essentially Eclectic
  26. Receipt Organization with Free Cut File by The Thinking Closet
  27. Cute and Easy Labels by Life After Laundry
  28. “What’s For Dinner?” Menu Planning Board by unOriginal Mom
  29.  Why do my cookies taste so bad? A lesson in baking. by The Life and Times of a TAP
  30. Custom Drawer Dividers by Please Excuse My Craftermath…
  31. The evolution of my labeling system by feto soap
  32. Ikea Drawer labels by McCall Manor
  33. Glass Etched Vinegar  & Oil bottles by Terri Johnson Creates
  34. Organize It: Bathroom Closet by The House on Hillbrook
  35. Ombre Butterfly Magnet Board by Sowdering About

Sharing with:

Give Me The Goods Linky Party #43  http://www.somuchbetterwithage.com/2014/01/give-me-the-goods-43-and-a-giveaway/

Bewitch Me & Titi Link Party 38  http://www.titicrafty.com/2014/01/bewitch-me-titi-link-party-38.html

The DIY Party  http://diyshowoff.com/2014/01/12/diy-party-diy-highlights/

The PINcentive Blog Hop #18  http://www.croppedstories.blogspot.com/2014/01/the-pincentive-blog-hop-week-18.html#.UtS-gvRDvk0

Create Link Inspire #7  http://www.nap-timecreations.com/2014/01/create-link-inspire-7.html

Do Tell Tuesday #6  http://www.lilmrstori.com/2014/01/do-tell-tuesday-6/

Awesome Things Tuesday  http://www.sowderingabout.com/2014/01/awesome-things

Handmade Tuesdays  http://ladybug-blessings.com/?p=4192

Share It Sunday Link Party #10  http://denisedesigned.com/2014/01/12/share-it-sunday-link-party-10/

Wednesday Roundup #8 http://honestysprotegee.com/2014/01/15/the-wednesday-roundup-8/

Take it on Tuesday blog hop #106  http://romanceonadime.com/take-it-on-tuesday/take-tuesday-blog-hop-106/

Inspire Me Wednesday #3  http://www.733blog.com/2014/01/inspire-me-wednesday-3.html

Artsy Corner Link Party  http://www.artsyfartsymama.com/2014/01/artsy-corner-link-party-3.html

Link’n Blogs Link Party #8  http://www.iputabirdonit.blogspot.com/2014/01/linkn-blogs-link-party-8.html

Catch a Glimpse Party #165  http://www.aglimpseinsideblog.com/2014/01/catch-glimpse-party-165.html

The Creative Connection #27  http://www.waittilyourfathergetshome.com/2014/01/16/creative-connection-27/

Wowza Weekenda Link Party #39  http://www.thepatrioticpam.com/2014/01/wowza-weekend-link-party-39.html

Thursday S.T.Y.L.E. #3  http://lifeinvelvet.com/2014/01/thursday-style-3/

The Party Bunch Link Party #13  http://www.whipperberry.com/2014/01/party-bunch-link-party-13.html

Link Party Palooza  http://lilluna.com/link-party-palooza-24/#more-41847

The Pinworthy Projects Link Party  http://domesticsuperhero.com/2014/01/17/the-pinworthy-projects-link-party/

Friday Favorites Link Party  http://madamedeals.com/friday-favorites-linky-party-11714/

Vinyl: My First Love

WE’VE MOVED!WE'RE MOVING!

Check out this post and other crafty inspiration over at our new blog!

www.mypapercraze.com


Good Morning and welcome to our very first post for the My Paper Craze blog!  We hope you are just as excited as we are to start on this journey into crafting!  If you get a chance, please check out the “About” tabs at the top — we tried to make ourselves sound interesting!  Also, please be patient with us as we tweek the blog over the next few weeks until it reflects our passion for crafting.

This week will be short and sweet.  I wanted to introduce you to my first love… vinyl.  This was my first true adventure outside of paper and it was love at first cut.  I started making a few things here and there and the next thing I knew, it was a full blown obsession.  Vinyl is so versatile, way beyond anything I ever imagined.  Today I used vinyl to create some custom tumblers for some extra-special recipients (you know who you are, lol).  These were made using the premium vinyl offered by Silhouette America and clear plastic tumblers.  As you can see, I packaged them up with advertising for our new blog ❤

20131001_064526 20131001_064658 20131001_064812 20131001_065122 20131001_073008

I won’t bore you with the ins and outs, vinyl is very easy for first time users.  Above Rubies Studios offers a YouTube video that describes the process from start to finish.  You can check it out here: http://www.youtube.com/watch?v=TRGZ3cuO3Nc

So take time to look over the tumblers.  For my lucky recipients, I hope you enjoy them.  Feel free to check back in to see what we are doing with the place.  We’ll have a new post for you every Tuesday, hopefully to showcase our weekly projects and inspire some creativity within you!  Thanks for checking us out and we look forward to next week’s journey!